Pen plotting with a 3D printer
Of all the things I’m not good at, it’s my lack of artistic ability that really steals the show. Anything involving “art” I can pretty much guarantee will result in disappointment. It’s a bummer, but it’s not all bad though. My artistic shortcomings are offset by a surplus in other areas like math and engineering. I suppose it’s this imbalance that fuels my curiosity with the generative art community; especially the stuff involving pen plotters.
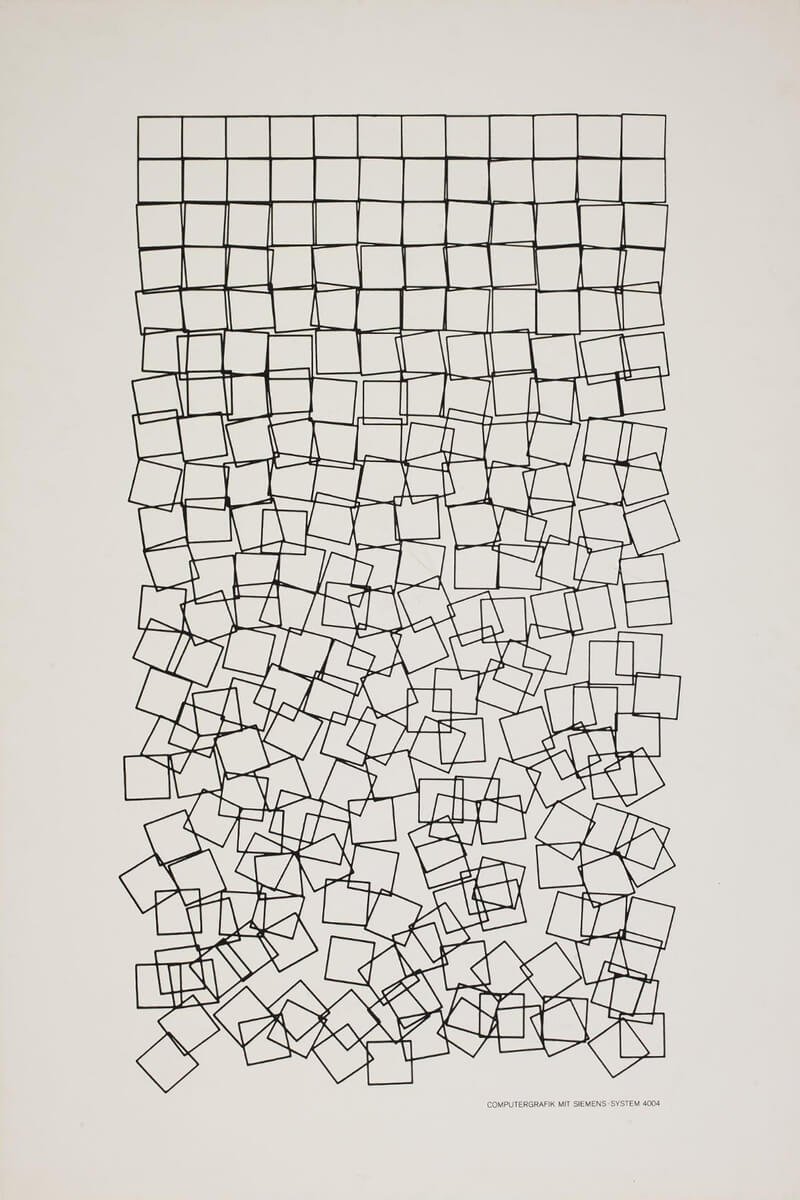
Schotter by Georg Nees (1968) | source
I recently picked up a copy of Tracing the Line and while flipping though it, I decided it was finally time to dip my toes in. I don’t own a pen plotter but I have the 3D printer I used to print my kayak. It doesn’t see a lot of regular action, so repurposing it into a pen plotter seems like a good move. Afterall, both platforms run on G-code. In fact, according to the internet, this conversion isn’t that uncommon.
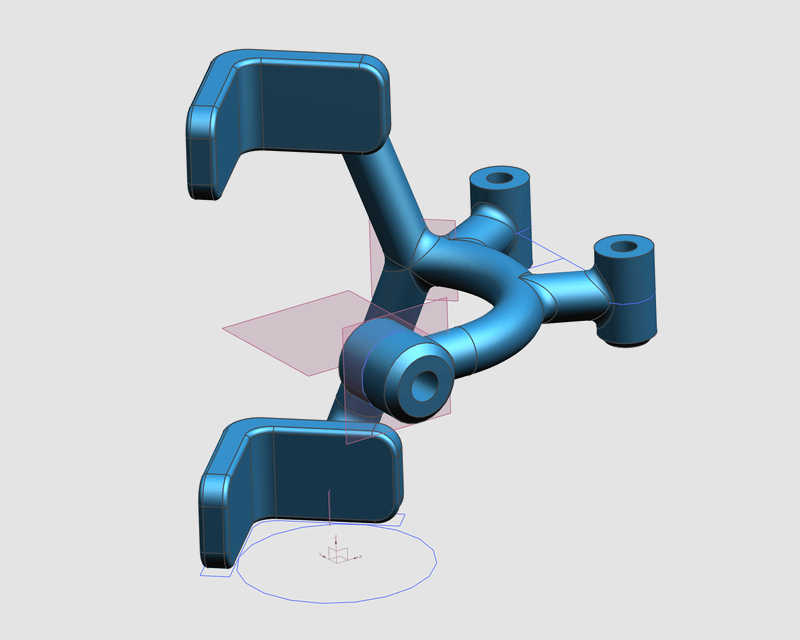
My initial plan was to simply print an attachment that could hold a pen in place. I’ve got a sufficient amount of PLA leftover from my kayak so all I really need is about 15 minutes of CAD time. This should be easy…
The more I thought about it though, the more I wanted something with a little more rigidity than what PLA can provide. No problem, I’m now a five minute bike ride from a pretty decent machine shop so spending an hour or two milling out an aluminum adapter is definitely possible. Ok, new plan: let’s machine this baby out of aluminum!
We’ll the more I thought about this new plan, I realized this could finally be my opportunity to try out one of the many new DMLS services. Why machine something out of aluminum when I can get it printed out of aluminum for only 10 times the cost? Or better yet, if we’re going to get wild with this, let’s stop beating around the bush and go whole hog. Let’s get this thing printed out of… titanium
So that’s what I did! A quick internet search yielded about a half dozen companies currently offering 3D printed titanium as a service but only i.materialise let’s you get an instant quote without forcing you to give up your email or other personal details. I appreciate that, so I gave them my business.
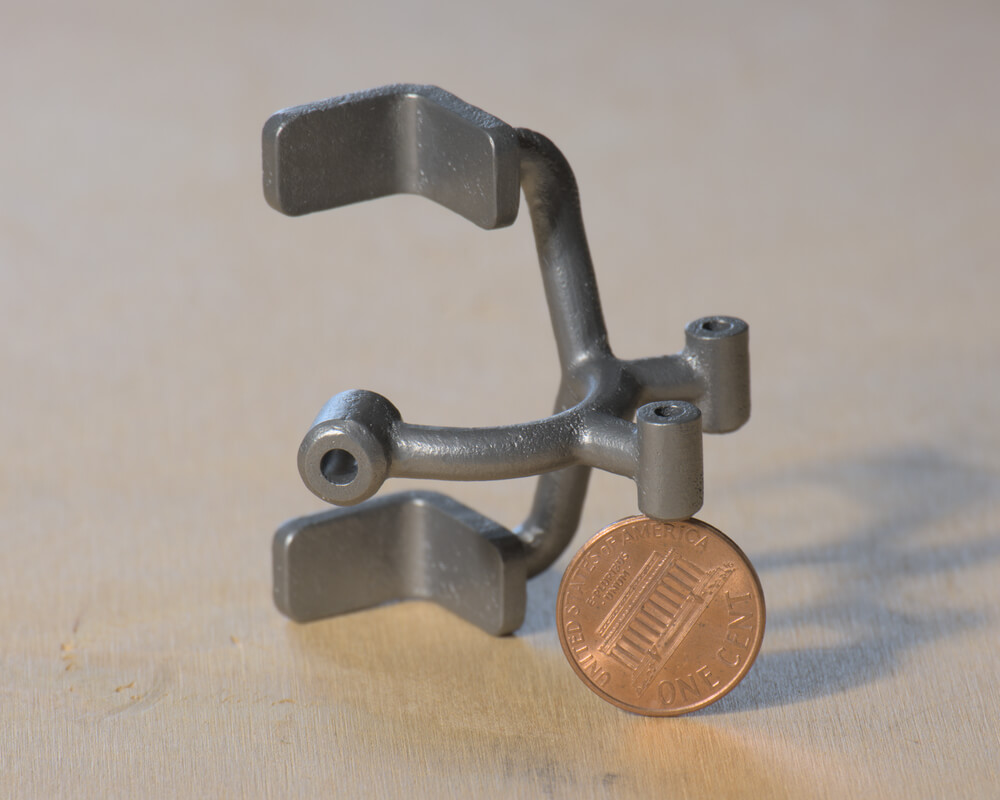
Overall, I’m really impressed with the final result. It ended up costing about $200 USD which also included the aluminum oxide abrasive treatment which produces the smoother satin finish. One of my primary curiosities with trying out a DMLS service was to see how small details are handled. Do small radiuses turn into chamfers or corners? To test this I put fillets everywhere and across a range of sizes. For reference, the smallest detail that i.materialise currently supports is 0.25mm for titanium, which is larger than some of the fillets I used. Even with these geometric conflicts, the problematic areas appear to have been handled pretty well!
The only thing I really had to do was tap two M3x0.5mm holes for the attachment points and one M4x0.7mm for the pen holder. Hand tapping titanium wasn’t something I’m familiar with but luckily I know Tony who happens to be a top-tier machinist. Compared to aluminum, it was pretty slow and tedious. It’s funny, I’ve read accounts of how difficult working with titanium is but in my mind I always think; yeah, but how hard is it really? I had a titanium lacrosse shaft in college and that thing lasted about 5 minutes of game play before it snapped. Turns out though, titanium is actually really freaking hard (shocker). Tapping these three holes (and breaking an M3 tap along the way) taught me that lesson really quick. Titanium also has poor thermal conductivity so even something like hand tapping heats it up fast! Lots of tapping fluid and frequent chip clearing is the name of the game.
After swapping the hotend for the plotter attachment and going through a couple of test runs, the initial results have been pretty good! I haven’t plotted any “art” yet, mostly small sections of openstreetmaps and some Strava data. I’ve been using OctoPrint to send G-code to the printer over usb which has been working nicely.
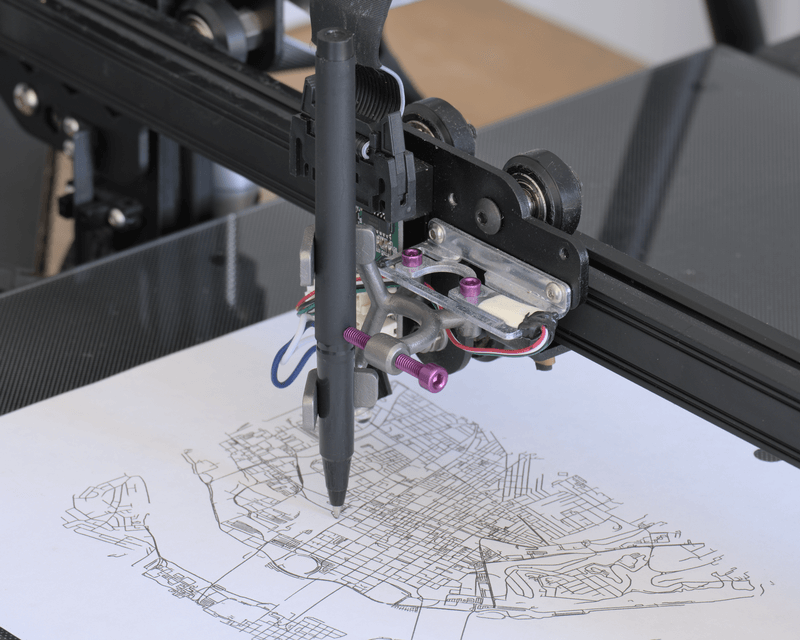
One thing I do like about using my 3D printer over a dedicated pen plotter is that I still retain full control over bed leveling. Because the CR6-MAX uses a strain gauge to determine contact between the hotend and the bed, by running G28 and G29 I’ve now ensured that when the pen contacts the paper, it will do so with the same force regardless of where it is on the page. At the moment, I’m just using an assortment of cheap pens I had laying around, but I suspect if I were to start using higher quality pens, having that force consistency could yield more consistent lines. That’s my theory anyway…
Like all good side projects, this one spiraled out of control nicely. What started out as a printed PLA part (which would have cost me nothing) morphed into a completely unnecessary hand tapped titanium DMLS part. It’s been working really well so I’m glad it unfolded this way. I’m looking forward to doing more plotter stuff in the future, but for now I can’t stop thinking about one thing: what else can I print out of titanium…